Tuesday, 20 July 2021

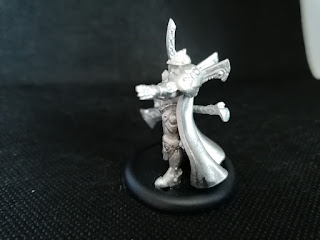
House Ellowuyr Warden Executioner: Model Review


Today we take a look at the House Ellowuyr Warden Executioner who is an Retribution of Scyrah solo for Warmachine and Hordes.
It comes in 4 metal parts.


The main bulk (and I do mean bulk) is in the body of the model with attached cape. This is the heaviest metal part I've handled in quite a while! Although the pictures show the metal to look grainy this is not how it feels so don't let that concern you. The sculpt is crisp and detailed and fits well with the look of the Warden unit but with extra flair which sets it apart. 


At first glance the attachment points for the arms look tiny but there are cuts into the cape which support the shoulder of the arm part nicely. I did not pin this model though I would recommend you to pin yours if you are heavy handed with your minis.


Plenty of scope for free hand painting on the cap and even the large stretched hexagon armour plates if you wanted to add something different.


A large hole in the top of the torso in which the head and neck armour fit nicely. No need to pin this really.


The cape really is chunky, I like the way the armour plates on the back of it are not extended through to the front. It really sells the idea they are attached on one side.


The arms are very similar though with different posing of the arms to allow the weapons to be held around that huge cloak! I'm not sure if the left hand axe shaft is meant to be bent like that, I've seen some strange Retribution weapons so I wasn't sure.
I really like the carved effects on the axe heads, they are crisp and well cast.


These shoulder weapons are an interesting look and fit in with the look of the faction.


I really like the fine detail in the helmets horn, its beautifully cast.


And here they are fully assembled.


And here is the scale shot with Professor Pendrake, about right for a heavily armoured warrior.
This is a nicely made if heavy miniature, I honestly expected the main body to be made of resin but I'm sure the casting team at Privateer Press have their reasons for it being fully metal. 
It has hardly any mould lines and the ones it had were very slight. The one criticism I have of this model is the lack of pose-ability for a solo which is field allowance four. Having four identical solos in my army would annoy me personally.


And finally I thought I would try something new! 
Using money from my generous supporters over at Patreon I purchased a rotating display stand. I like to put the money form supporters back into improving the content I make.
I'm hoping to get better at making these over time, one thing I know I want to save for is a better camera (I currently use my phone).
Please let me know what you think of this addition to my model reviews. 
I also plan to make similar videos for painted model articles.
With that in mind I have another question for you - should I go back and make these videos for models I have already painted?

If you want to support my content consider taking a look at my Patreon which you can find here. I don't put any content behind a paywall but I do offer rewards to people who support me in ways like getting to vote on what content I work on in the future or outright just picking the next subject of an article.
Even if its just $1 it really helps me out

See you all next time!

Monday, 19 July 2021

Toro Heavy Warjack Painted (Conversion)


I finally finished up my converted Toro for my Pirate mercenary army! I started this conversion so long ago that originally it was going to be a Nomad. Once the Toro came out I changed my mind and removed its small buckler and gave it a nice big shield.

Back when I was first converting this Warjack I posted work in progress pictures to various groups and received negative feedback such as "like an Ironclad with bits glued on" and other comments, which is their point of view for sure. BUT... I will be using it anyway and I very much enjoy converting my Warjacks to look more "piratey" to fit my chosen theme.
There is a small group of the Warmachine community who do not like conversions, but I am firmly on the other side of that debate, I love conversions and will keep doing them for as long as I'm in the hobby! As long as the other player is informed that this is a Toro its not an issue for my gaming group.


The Sword is scratch built using plasticard. Its a little crude but does a good job in selling "pirate" for me.


I removed the Ironclads dual smoke stacks and replaced them with some piping. The widest one is actually ferrule from an old paint brush!


The shield is made with a 3D printed wagon wheel which came with a forge terrain kit I bought a long time ago. (You can see that forge terrain here if you want to) and cut up coffee stirrers for planks.


I attempted to make an eye patch for this guy but I'm not super pleased with how it turned out. But not dissatisfied enough to try and remove it or do anything else with it.


I also added a bed roll just above the right shoulder. This is to add a sense of visual balance to the model as well as some visual interest and a sense of lack of uniformity I am going for with my pirates.


And finally I thought I would try something new! 
Using money from my generous supporters over at Patreon I purchased a rotating display stand. I like to put the money from supporters back into improving the content I make.
I'm hoping to get better at making these over time, one thing I know I want to save for is a better camera (I currently use my phone).
Please let me know what you think of this addition to my painted model articles.
If you like it please like, comment and subscribe on Youtube it really does help with letting youtube know its a video worth suggesting to other hobbyists. (And it upsets Mike...)

If you want to support my content consider taking a look at my Patreon which you can find here. I don't put any content behind a paywall but I do offer rewards to people who support me in ways like getting to vote on what content I work on in the future or outright just picking the next subject of an article.
Even if its just $1 it really helps me out!

See you all next time!

Sunday, 18 July 2021

House Ellowuyr Wardens: Model Review


Today we take a look at House Ellowuyr Wardens who are Retribution of Scyrah unit for Warmachine and Hordes.
The unit comes in 16 metal parts.
These models were sent to me by Privateer Press to review. (Sorry to them for how long its taken me to get round to writing this, my lifes been a mess)


These are the parts that make up the unit leader who's assembly is different from the rest of the unit.


The contact point for the waist attachment is a simple bump/dent style which works well and didn't feel like it needed pinning.


The cape is smooth and well flowing, I imagine it would be a great surface to try some free hand painting if you have any skill at that.


The connection point for the shoulders and arms is round on the back and is pretty easy to attach. The left arm has the two sticking out back pack style parts.


The right arm holding the weapon some people might find it worth pinning in place. I didn't have any issues gluing it, but if you expect it to be handled roughly in game it might be worth it for you to pin this.


These are the two different sculpts for the grunts in the unit.


Very large attachment points on the backs of their torsos.


There is a small amount of flashing behind the horn on the helmet. This was easy enough to remove with a sharp hobby knife.


These upper back torsos also have the upper arms attached to them and have two different sculpts.
I did test fit both of them on each body to see if I could mix and match them to make four different grunts. Sadly they only fit on the body they were designed for, though to be honest this is what I expected - I just wanted to see if it could be done for variety.


Very slight mould lines on this part, they took me a few seconds to remove.


There are slight mould lines on all the shafts of the weapons, these too a few minutes to remove from them all using a small hobby file. These do fit relatively well but it might be worth pinning them if you are rough handling your minis!


And here they are fully assembled


The leader has that traditional "directing the troops" pose. I did also notice after assembling them all that the leader model has a longer helmet horn with engraved details which is a nice touch.
I really like how the cape is not melded into the legs due to them being separate parts this is a really nice touch by the sculptor and producer.


Scale shot with Professor Pendrake


The two grunt types have nice poses, they look like they are about to do horizontal and vertical swipes respectively.


Over all I think this unit is really nicely sculpted and the quality is great, barely any mould lines and they were easy to assemble.


And finally I thought I would try something new! 
Using money from my generous supporters over at Patreon I purchased a rotating display stand. I like to put the money form supporters back into improving the content I make.
I'm hoping to get better at making these over time, one thing I know I want to save for is a better camera (I currently use my phone).
Please let me know what you think of this addition to my model reviews. 
I also plan to make similar videos for painted model articles.
With that in mind I have another question for you - should I go back and make these videos for models I have already painted?

If you want to support my content consider taking a look at my Patreon which you can find here. I don't put any content behind a paywall but I do offer rewards to people who support me in ways like getting to vote on what content I work on in the future or outright just picking the next subject of an article.
Even if its just $1 it really helps me out

See you all next time!