Showing posts with label Gaming aids. Show all posts

Sunday, 5 July 2020

Product Review: Hullgrinder Fabric Playmat


Today we take a look at the hullgrinder map for Riot Quest!

I was extremely excited to try this map out and find out how it plays differently from the starting arena of the Thunderhead fortress.


The map is really well printing with bright vivid colours and interesting details.
I could have taken way more pictures to show you all of the fun things included on this map but I want you to experience it for yourselves somewhat.
I know I spent some time gazing over it drinking in the detail and fun inclusions like the patch of crabs as an obstacle space.


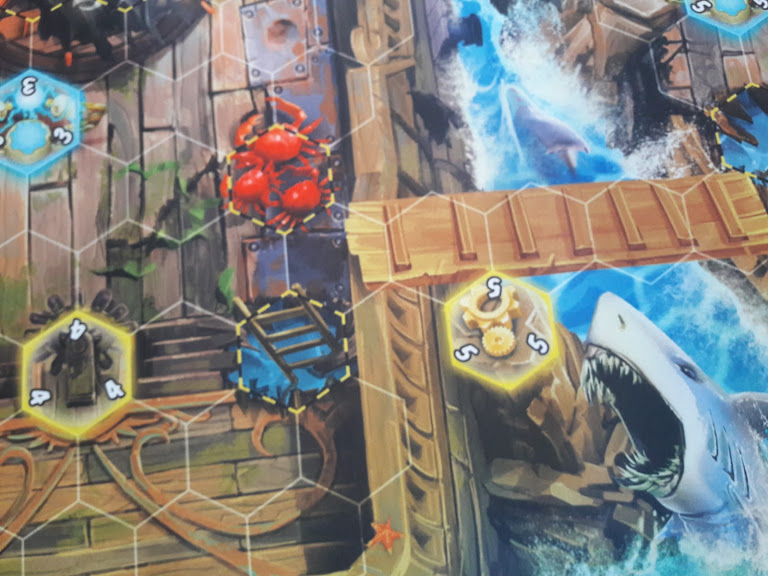


Made of the same material as the Thunderhead fortress map it has a mesh style rubber backing which really helps it grip onto glossy flat surfaces and is super flexible.


Have you tried out the Hullgrinder map yet? What did you think of it?
I've really been enjoying it and how it changes up the dynamic of the game.
The three gangplanks between the two ships certainly become hard fought over areas, and models with movement abilities which allow them to move through or over enemy models really go up in value on this map.
On a similar level gear which places models on the table such as the ones from the Gear expansion can be great for blocking enemy movement from one ship to the other unless they remove them first.


If you want to pick this up for yourself you can find them here at The Outpost (a UK webstore I'm affiliated with)

If you want to support my content consider taking a look at my Patreon which you can find here. I don't put any content behind a paywall but I do offer rewards to people who support me in ways like getting to vote on what content I work on in the future or outright just picking the next subject of an article.


See you all next time!

Saturday, 21 March 2020

Product Review: Thunderhead Fortress Fabric Playmat


Today we take a look at the Thunderhead Fortress Fabric Playmat.
I was sent this mat to review and try out by Privateer Press so big thanks to them!


Made of a neoprene fabric the mat is well printed with clear details and bright colours. 


The spawn gate spaces which will soon be hidden by painted Spawn gates from the Weird Wendell and Spawn gate expansion! They are really clear and easy to spot across the table though, I like how the associated numbers on these and the treasure spots are printed to be easily readable from multiple angles. I've got pretty poor eyesight so this was something I feel grateful of.


The printed cloth is very securely attached to the rubber underlay. I have seen game mats friends have owned where the fabric ended up peeling off from the rubber. I gave this one a few digs with a finger nail and it didn't budge so I'm pleased with that.


The rubber underlay has a chain mail looking pattern which really helps the mat to grip in place on what ever surface I have tried it on. 

This map is not a "must have" as it is the same map that comes in the starter box but,,,
What I would say is that its a quality of life upgrade, no more bent corners or worn folds from the paper map. If you ever plan on taking pictures or videos of your games the paper map gives off a lot of glare due to the glossy paper its made of so this map removes all that. It will last a lot longer especially if stored well rolled or gently folded. (I would not advise storing anything on top of a folded up mat) 

Being the map that also comes in the starter set it is a straight forward open arena with areas of rough terrain and the spawn gates and treasure are spread evenly through the arena.

If you like Riot Quest I fully recommend getting this map its a big upgrade on the paper one from the starter box!

If you want one for yourselves you can get the here from The Outpost (UK webstore I'm affiliated with) though I should add that these have been really popular and sell out completely often meaning there is sometimes a wait for more to be made!

Sunday, 29 April 2018

Custom Tournament Tray


I made my tournament tray a while ago but never got round to posting it, a few people have asked how I made it when I have posted my pictures of my tray at the start of tournament so I figured I would go over how I made it.


This is just me "test fitting" all the parts

It all started with the trays which I bought at my local £ shop, they were discounted "mothers day breakfast trays" being sold off after mothers day. Being cheaply made I doubted their sturdiness but decided to chance it given how cheap they were. I picked up a length of 1.25" x 1.25" wood and cut it to length to be used as the upright supports. I measured it out to make sure I would be able to fit large models on the lower layer. (I used my Stormstrider as it is the tallest model I wanted to be able to fit)


The joints of the tray looked to be just glued so I added right angle bracing to add strength to it. I drilled through the wood first (very slowly to avoid damaging the tray)
For the top layer I bolted the bracing pieces in place.


As you can see here I drew on in pencil where the supports would be located. This helped me drill in the right place when I attached the supports.


I drilled up from underneath the bottom layer through the tray and into the supports. I then secured the supports with screws


I then attached bracing right angles to the bottom layer attaching them by drilling through the tray and into the side of each support.


Finally I attached the top tray by drilling down through the tray and into the tops of each support, again fixing it into place with screws.


Here is the tray fully assembled.


Plenty of room to fit both my Stormstriders on the bottom layer.


I then turned my thoughts towards how I would decorate it, I had wanted to use some of my MK2 stat cards for a while and this seemed the ideal project for them. I just had to pick which ones I wanted to use.


I had a spare sheet of Plastic canvas or Granny grating as it is also known, so I decided to add it on to one end of the tray. I tried out attaching my PP pins to see how it would look.
The PP pins are really hard to get over here in the UK sadly... I got these ones at Smogcon 2 years ago. 


For painting I just went with a simple black undercoat and then took a grey spray paint and made it look weathered. 


I like how the pins look on my tray it gives me a good place to keep them all together. I would like to get more one day, but I'm not paying international shipping and import taxes for them...


When it came time to pick which cards I wanted to use it was a little bit tough! So many good memories using loads of models in mk2. In the end I went with most of the models I liked to use in my old Caine2 list for the top tray, and all the Trencher cards on the bottom tray.
trenchers are the models that got me into Cygnar so it seemed only fitting they got a place on the tray.
I glued them down using PVA glue (white glue) putting a sheet of cling film (Saran wrap for my American readers) over them all then weighing them all down with a pile of books so that they didn't curl up.
Once they dried I applied another layer of glue over the cards to protect them from being easily scuffed or scratched.


I love my tournament tray, it quite often gets a question or a compliment at a tournament or online when I post a picture during an event.
I saw a picture PP's Dallas shared the other day in which he had free hand painted some menoth iconography onto someones tray. This has inspired me to try the same so I might be cracking out the paints at some point in the future to give it a go on my tray!

What do you think of my tray? Would you have picked different cards to decorate it with?

Monday, 15 January 2018

Constance Blaize Custom Soul Counter


So I made a custom soul counter for Blaize!
I have wanted to do this for a while, though I haven't felt the need to play her much in mk3 I wanted to make it as a hobby project.


I wanted the knights to look like they are dying with their souls just leaving their bodies to represent Blaize's feat. I sculpted the souls, they aren't my best work but I'm happy enough with them.
I also drilled into the knights at a few points to represent bullet wounds, painting the blood coming from the wounds was a fun effect to paint I haven't done much painting like that before.


I contacted Privateer Press's lore master Doug Seacat to ask about souls being collected by a "good" source. I have only seen them collected by cryx in the artwork which has them green looking and they have a tortured look. He told me they could look silvery or blueish, so I went with blue as I wanted them to differentiate from the silver of the knights.


The counter goes all the way up to 20, though I doubt I will ever have it get that high!
I painted Blaize and her knightly forces back in May 2015 you can see them here if you want to
in better detail, but here are all my Morrowan forces gather together!


So what do you think of my custom soul counter? Really hoping Blaize gets some love with new models or rules changes.

Wednesday, 5 April 2017

Custom Cygnar Objective and Flags

Here are my flags and objective for my Cygnar army


I thought seeing as I have been showcasing my non model based hobby stuff lately I would also share my Cygnar Objective and Flags

The objective I made using Stryker3's flag. There was no way I was happy to have the flag increase the space he would take up in my case. Plus it would be so likely to bend or break. I have seen this happen to so many other players versions of him. So I decided to convert him to be holding a shield instead


So I decided to use it to make an objective. I pinned the flag to a brass rod which was tricky to do with how thin they both are.
Then I added some sandbags and a barrel for added detail, these are from Renedra

My flags are made using the banners that come with Stormclads. There was no way I was adding that much height and therefore space in my case for a flag. So I left them off and green stuffed over the hole.
I added a few details to the base of each one and pinned them onto a brass rod.


Here they are in action against my regular Protectorate of Menoth foe

I like the way they tie together with my army and its really nice to turn up to a tournament and put nice looking flags on the table rather than proxy bases which are easy to forget.
It helps me remember that they are there and pushes me a little more to play for scenario.
What do you think of my flags and objective?

Monday, 3 April 2017

Custom painted AOE templates

I realised that I hadn't shared these on the blog the other day when I showed them to one of the guys at my club


I bought a set of mdf laser cut aoe templates and decided that I wanted to paint them to match various effects in my Cygnar army


(How they looked when I got them)


For the 5" aoe I painted one for Foxhole, Magesight and Electroconduction (the gun from Silverline Stormguard)

Foxhole

Mage sight

Electroconduction 

For the 4" aoe I painted an area to represent the rough terrain from Siege'e Rift spell
And also Ryan from the Black 13th Mage storm attack, which is sadly no longer in the game...

Image result for how dare you meme
(PP invalidating my purchases!!!)

Rift

Magestorm (now gets used for the cloud generated by the Fuel Cache objective)

The 3" aoe I painted electrical storms that will work with either Styker2, Sturgis or Jakes2's electrical storm spell or the aoe which remains in play from the reliants gun.

I might need a few more of these if I ever choose to spam Reliants (not too likely at the moment)

What do you think of the painted aoe templates? I think they add a level of detail and make it easier to remind both players of what effect the aoe has.