Wednesday 25 August 2021

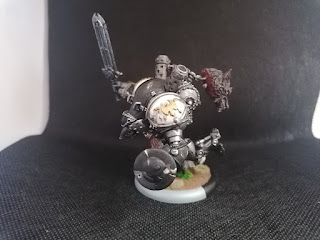
Headhunter (Stormclad) Painted (Conversion)


My Headhunter conversion is finally finished! This project has been wip for a very long time. It was a community project with the crew over at Rikers Iron, a epic project spanning many long twitch streams (You can find his channel here)
There has long been talk of doing the final push to finish the project off, but this summer I have been struggling and needed a "win" and to reduce my wip projects list so I finished it up.

To anyone unaware, Headhunter is the Stormclad featured in the novels "Into the Storm" & "Into the Wild". It has a ton of character and a lot of fans of the books have made their own versions of it over the years. Here is mine!


I really wanted to pose this Warjack as dynamically as possible in a way which really showed off the aggressive nature of its character as represented in the novels.


I really like the cut into its head armour just above the eye, I really think it adds a menacing look to the Warjack.
There are cuts and bullet impacts all over this Warjack see how many you can spot!


Huge arrows (one has the flights snapped off) protrude from the buckler, these are very large and intended to have come from the skinwalkers Headhunter fought in the novels.


I added verdigris to all of the bronze looking metal parts which really give it a worn look compared to my other Warjacks. 


A Convergence Vectors head is tied to the right arm, I weathered this with verdigris as well as painting it to match the other Convergence models I have painted in the past.


The stepping off point for its pose is the Menoth light Warjack wreck which comes with Stryker2. It had been in my bits box for years as I didn't want to use it for him. Getting the Warjack to stay attached and not fall apart was a tough challenge. There are pins doing into the wreckage and more going from the hip into the upper leg. 


I used chain from a Mountain King to attach a Cryx Warjack head and a Warpwolf head to the boiler area. 


Painting all the pressure gauges was fiddly but rewarding once complete.


I really enjoyed painting the decapitated Warpwolf head. Trying out new ways to get the fur to look natural, as well as the transition area between the fur and the snout. 
I went with milky white eyes, I'm not sure if these are exactly how they "should" look once its been dead a while but my search history is already pretty dodgy given the other reference pictures I look up for painting inspiration... so I just figured this would do...


Oh and because its me, of course I magnetised it! I did this mainly to make it easier to transport given its outlandish pose. But if I wanted I could use it as a Reliant, although I already have two standard Stormclad/Reliant kits painted and magnetised so unless I write a list with three Reliants in it I'm in no rush to paint the Reliant arms for this model.


And finally I thought I would try something new! 
Using money from my generous supporters over at Patreon I purchased a rotating display stand. I like to put the money from supporters back into improving the content I make.
I'm hoping to get better at making these over time, one thing I know I want to save for is a better camera (I currently use my phone).
Please let me know what you think of this addition to my painted model articles.
If you like it please like, comment and subscribe on Youtube it really does help with letting youtube know its a video worth suggesting to other hobbyists. (And it upsets Mike...)

If you want to support my content consider taking a look at my Patreon which you can find here. I don't put any content behind a paywall but I do offer rewards to people who support me in ways like getting to vote on what content I work on in the future or outright just picking the next subject of an article.
Even if its just $1 it really helps me out!

See you all next time!

Sunday 15 August 2021

Swabber Heavy Warjack Painted (Conversion)


I converted this model a while ago... like a long time ago. Back when the Swabber was going through CID but hadn't been released as a model to buy yet I remembered that I had a Mariner unbuilt in my bits box as well as some other parts so I figured I would try to make my own and have one on the table before the retail version releases... 
yeah well time makes fools of us all and a whole list of reasons later and it never got finished...
until now!


I used a Rovers shield which was knocking about in my bits box combined with some 40k gun which I cut down and used some green stuff to attach to the shield. I would have used the Rovers gun but that wasn't something I was given via whichever kind person gave me the shield at some point. (Seriously I have no clue exactly where some of the things in my bits box originally came from anymore)


The harpoon was "donated" by some kind Cryx Reaper, or at least the person who owned the kit and didn't make a Reaper with it!
(I'm pretty sure the harpoon came from my friend Andrew, but again I'm not sure. Thanks to him anyway for in general being a top bloke though!)

Even though this conversion took me way longer to finish than it should have, I'm very glad that its now finished and can join the rest of my pirate army!
I was very unsure about the brown/orange paint scheme for this Warjack but I really want to continue the theme I have of not painting all my Warjacks the same colour and this jumped out at me at the time so here we are. What do you think of this conversion and its paint scheme?


And finally I thought I would try something new! 
Using money from my generous supporters over at Patreon I purchased a rotating display stand. I like to put the money from supporters back into improving the content I make.
I'm hoping to get better at making these over time, one thing I know I want to save for is a better camera (I currently use my phone).
Please let me know what you think of this addition to my painted model articles.
If you like it please like, comment and subscribe on Youtube it really does help with letting youtube know its a video worth suggesting to other hobbyists. (And it upsets Mike...)

If you want to support my content consider taking a look at my Patreon which you can find here. I don't put any content behind a paywall but I do offer rewards to people who support me in ways like getting to vote on what content I work on in the future or outright just picking the next subject of an article.
Even if its just $1 it really helps me out!

See you all next time!

Thursday 5 August 2021

Product Review: Mantic Terrain Crate Dungeon Debris


Today we take a look at the Dungeon Debris Terrain Crate by Mantic Games.
One thing worth mentioning right from the start is that they are all made from a softer plastic which can be bent. The set comes with two of each piece.


Here are all the pieces laid out with Professor Pendrake for scale.


I really like this stack of crates, they have a good variety of sizes and some of them have paper labels laid on them.


Here you can see how the parts were glued together.


The collection of barrels are nicely detailed and are visually distinct from each other with is a nice touch. I like how one of the barrels is open with its lid resting against the barrels.


From directly above you can see the connection between all the barrels. I think it would be wise to make sure this is painted very darkly to hide it.


This improvised barricade is made from a real mix of materials. It gives me a feeling of a shipwreck or abandoned building perhaps with the damage the various things have taken.


This pile of bricks and a column. I really like this piece as it gives a great way to add detail to a ruined building which are a fairly common sight on wargaming tables.


There is also a smaller pile of bricks and rubble which is also pretty nice. I think I will have to make a ruined building for these one day.


Another style of improvised barricade. There are some nice different visual elements which make up this one, however they are quite visually unique so I feel that having both of the two which come in the set near to each other ruins immersion somewhat. This can be reduced a bit by having them face opposite directions though.


This pile of logs is decent enough, they do have an almost comic style growth rings on the ends of them.


Its a big crate... similar to the ones in the stack, but bigger and on its own... There is glue residue on the top where the lid was attached. I scrapped this out with a hobby knife.


These two parts are a single rat and a group of three rats. The mould lines on them are awful and the detail between the different rats is badly defined leading them too look like they merge together. I don't know what I might end up using them for to be honest.


These skulls have pretty rough mould lines across them and even after some clean up I wouldn't be happy to use them in any way in which they were in focus or have a lot of attention on them. They would be fine to have half buried in terrain or as basing on a mini though.

When cleaning up the mould lines on these I found that filing didn't work at all due to the softer plastic. I found I essentially I had to cut the mould lines off being careful not to cut into the part too much.

Over all this is a decent kit which can add a lot of scatter terrain or detail larger terrain projects, however the quality is somewhat lacking and I would not advise paying full retail price for this set.


If you want to support my content consider taking a look at my Patreon which you can find here. I don't put any content behind a paywall but I do offer rewards to people who support me in ways like getting to vote on what content I work on in the future or outright just picking the next subject of an article.

See you all next time!