
Today we take a look at Artificer Prime Nemo & Arcane Mechaniks.
The kit comes in 13 parts, 5 of which are resin. It also includes a clear plastic flight stand.


I'll start with the easy stuff first, here are the three mechaniks which come with Nemo4. There is one leader sculpt and two identical grunt sculpts. Some of them had bent staffs so I was careful when bending them straight again to make sure they didn't snap off.

The leader, pictured here on the left is a single piece model. For the grunt, the left arm is a separate part. There is a piece of flashing or excess metal connecting the leader models staff to their hip which needs to be carefully removed as to not bend or damage the pole.

These are very nicely sculpted and fit visually with existing Stormsmith models, though they have extra equipment with their tool belts and front pouches. This identifies them as mechaniks somewhat as that's where they would keep their tools and spare parts. You can even see a hammer hanging on each models hip, percussion maintenance anyone??

These are the voltaic coils which attach to the top of Nemo4's "hull". They are each progressively larger (or smaller depending on your perspective)

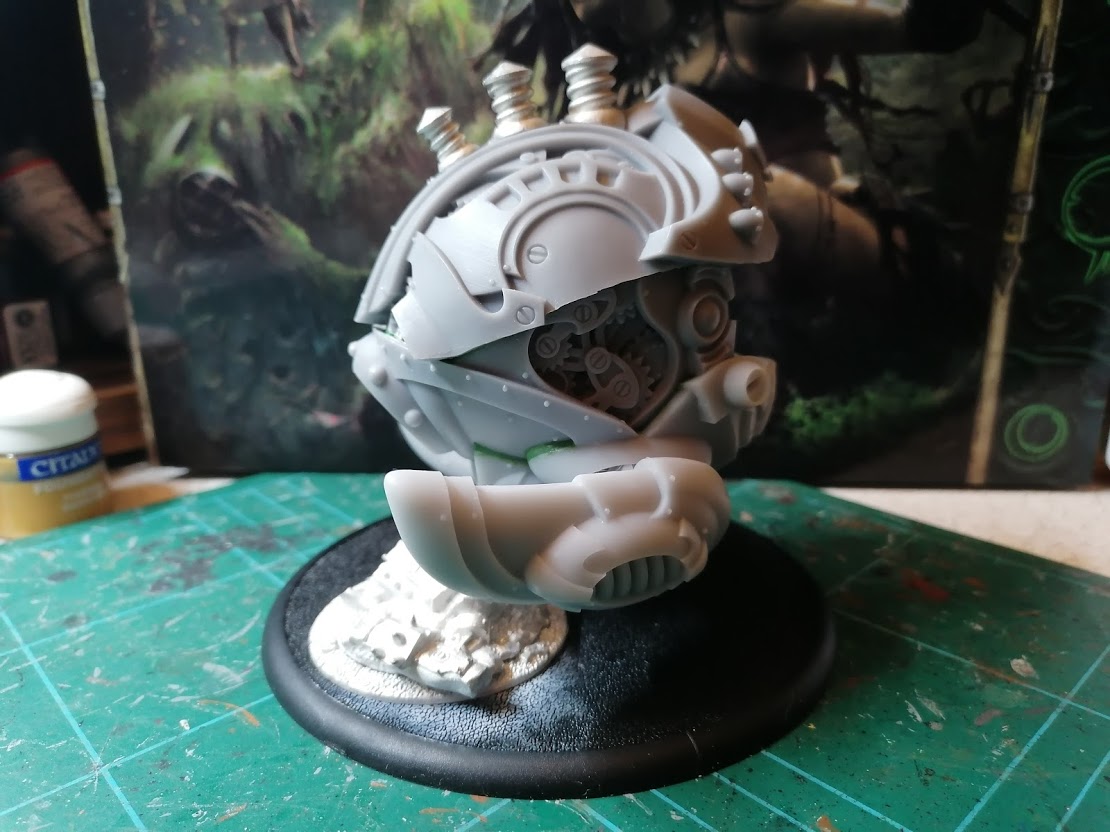
This large resin part is the upper part of Nemo4's hull. It is really crisp in its details which go quite deep into the piece especially around the clockwork sections.


These three dents in the top are where the voltaic coils attach.

On the underneath you can see a few resin injection ports. These need cutting off and filing/scraping smooth. Remember that resin is toxic so wear a mask!

These thin rectangle injection ports on the back are easy to miss, but need cleaning off to make the model look its best.

The middle section is very large and nicely detailed. The clockwork parts are particularly good with multiple layers of parts with no loss of detail.

There is a pretty bad mould line/slip on the upper part of the "eye". I was initially worried about how I would be able to fix it, or if I would have to put in a replacement parts request.
Once I dry fitted the upper part however it turns out this mould line is completely covered and isn't visible so I didn't need to worry about it.


This part is the lower portion of the model, and is where the fin looking parts connect.


The resin injection ports are on the back end of this part. You can also see the round dent where the flight stand attaches.


The two fins or nacelles as I will be calling them from now on are on a resin sprue. I suggest clipping them off a short distance from the actual part itself to insure the part is not accidentally damaged should the resin snap.


These vent looking parts are really nicely cast, again the detail goes deep into the model. I think I will paint these as if they are voltaic coils.


The mould lines on this one are a little rough but I managed to get them pretty much cleaned up. Though they are still visible its not bad enough to overly concern me.

This is the flight stand. I'm not a fan of these to be honest, they break immersion for me and I find that they are often a weak point in the structure of the model often breaking off.


After removing the resin injection ports I dry fitted the main parts. There are some sizeable gaps between some of the parts especially the bottom part.
I had to use hot water then press the middle and bottom parts together then put them into cold water a few times to get the parts to line up as closely as I could before using green stuff to fill the rest of the gaps.


So I tried how it looks using the flight stand supplied just for the completion of this article. I have no intention of using it. I was thinking that it might be possible to mount the model onto one of the wreck markers I had sitting waiting for a future project.


I have a Cryx, Cygnar, Mercenary and Protectorate wreck marker to choose from and I tried them all to see which would look the best and provide the most stable connection.


The Protectorate one had the easiest connection point with its smoke stack relatively upright it would provide a great place to drill down into. I just had to figure out which way to face the wreck marker.


I drilled into the smoke stack of the wreck marker and made a hole large enough to fit two brass rods.


I drilled the hole up into the attachment point and filled the gaps with green stuff. I uses small pieces of masking tape to stop the green stuff sticking the wreck marker to Nemo as I wanted them separate for now. I might glue them together once its all painted, or I might keep it removeable for transport.

And here they are fully assembled.


Here is a scale shot with Professor Pendrake.

And here is a scale shot with just the mechaniks who are slightly taller than average but not stupidly so.
Overall I like this model but it has some issues which I am not impressed with. I think its a shame to get too identical grunts in a unit of three, it makes the unit look less unique.
There was also a larger than typical amount of gap filling and heating the resin parts to reshape them than I would expect from a kit of this price. Though as what I would call a "centre piece" model the extra work does not feel like wasted effort as it does look impressive once finished.
I hope you found this interesting, if you did please be sure to let me know I value your feedback.
I will be doing an article sometime soon about the basing I am doing for this model so follow me at the social media places to make sure you don't miss it!
I will be doing an article sometime soon about the basing I am doing for this model so follow me at the social media places to make sure you don't miss it!
If you want to support my content consider taking a look at my Patreon which you can find here. I don't put any content behind a paywall but I do offer rewards to people who support me in ways like getting to vote on what content I work on in the future or outright just picking the next subject of an article as well as some wip content.
Even if its just $1 it really helps me out!
See you all next time!
No comments:
Post a Comment